An admin can create a project(s) in Freejna by pressing on create a project, then the user will be redirected to “Create New Project” form
The first section of the Project is “Details“, here the Freejna admin adds all of the data related to a project.
Details

To create a project an admin enters data in the following fields:
- Admin user can switch between languages (English , Filipino , Urdu and Arabic )to fill the project information in all languages (one language must be fill)
 In this form Admin user enters the required data for adding projects which contain :
 - Title (Required) : The admin can add title based on selected language in option1
- Description(optional) : The admin can add project description based on selected language in option1
- Owner (Required): In this field, the admin can search for the project owner by name from a list of Freejna owner organizations . By adding the owner to the project the owner will be shown in the Freejna app. If the admin wants to change the owner or delete it then he can press (x) to remove the current owner.
- Contact: This field is the email of the Owner and it is being filled automatically when selecting the owner
- Neighborhood(s) (Required) : Here the user selects the Neighborhood(s) that the project belongs to, so the project will appear in these Neighborhood(s) in the Freejna App.
- Start and End Dates (Required)
- Status (Required): Here the admin selects the latest updated project status, so the Freejna App users can be notified with the updates. The project status may be one of the following:
- Not Started
- Started
- Completed
- On Hold
- Canceled
- Progress (optional): In this field, the admin sets the progress of the current status
- Location (optional): Admin user can press on location textbox to search for a location then a popup appears including an autofill search box, map will be updated to the searched location. The admin can then press in the exact location so a red marker appears, after that he needs to press on Ok button.
- Outlines (optional): The admin can draw a closed area border of the project location .
- The admin can press on a location to select the first point of the outline, then press on remaining points till he reaches the first point of the outline to make a closed outline.
- The admin presses OK button to save the changes.
-
-
- When the admin finishes entering the project card data then he presses save.
- In case the admin wants to go back to the Project table he presses “Back”
- In case the admin wants to cancel creating the project card then he presses “Cancel”
- The default Project Status is “Draft“
-
- Attachments(optional): The admin uploads the project images so it can be shown in the Freejna App (The Image at the left is the main image ). The user can select the main Image by pressing the green mark and can delete the current image by pressing the recycle icon.


- Admin can press on “Publish” or “Archive” then the project status will be equal to “Published” or “Archived” based on the option selected.
The second section of the Project is the project “Phases” and here the admin manages all related phases of a project. In case no added phases, admin get the following message “There is no phases added for this project. ”

The admin creates a new phase by pressing the “Add Phase“, then a popup appears
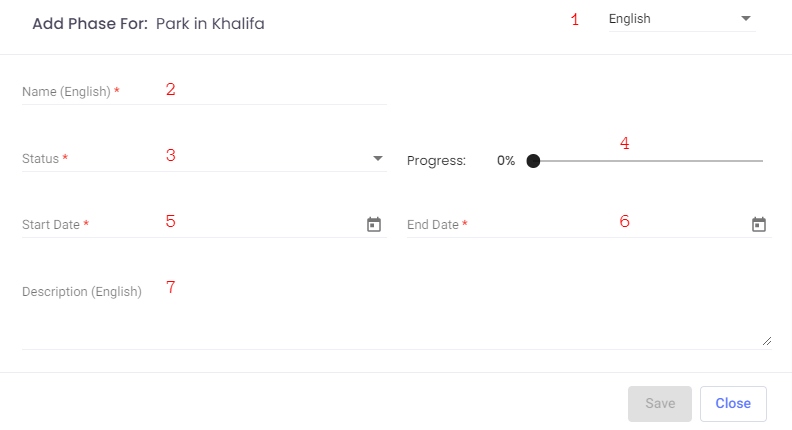
- Admin user can switch between languages (English , Filipino , Urdu and Arabic )to fill the information in all languages (one language must be filled)
- Name (Required) : the admin can add title based on selected language in option1
- Status (Required): which has the following values:
- Not Started
- Started
- Completed
- On Hold
- Canceled
- Progress(optional): The admin sets each phase progress according to the related status
- Start Date (Required) : the start date of a project phase and it should be greater than the current date
- End Date (Required) : the end date of a project phase
- Description (optional) : the admin can add title based on selected language in option1
When the Freejna admin saves the data, a new project phase is being added to the Phases section, and here the admin can:
- delete the phase by pressing the minus (-) sign, and here the admin gets a popup confirmation message
- edit the phase by pressing the edit button